Introduction
Business operations demand more than data storage—they require embedded intelligence that understands your processes and executes complex workflows. Consider the approval chain that routes purchase orders through the right managers at the right time, the payment system that processes transactions while maintaining compliance, or the inventory tracker that calculates availability across multiple warehouses. These aren't spreadsheet tasks; they're specialized business functions that typically require separate software, complex integrations, and constant context switching.
App Columns embed these specialized functions directly into your data. When you add an Approval column, you're not just tracking approval status—you're deploying a complete workflow engine that understands hierarchy, manages escalations, and maintains audit trails. When you implement a Payment column, you're integrating a full transaction processor that connects to Stripe, handles refunds, and reconciles automatically. Every App Column transforms a cell into a specialized application, eliminating the need for external tools while maintaining the context of your data.
The magic happens through contextual integration. Your Payment column knows which invoice it's processing, your Approval column understands the requester's department and budget limits, your Cart column sees available inventory in real-time. This awareness eliminates manual data entry, reduces errors, and accelerates processes that traditionally take days into actions completed in seconds.
What are App Columns?
App Columns are Proma's specialized field types that embed complete business applications within your data structure. They transform simple data fields into intelligent processors that handle complex domain-specific operations—from payment processing and approval workflows to inventory management and time tracking—all while maintaining seamless integration with your existing data.
These columns serve as the business logic layer in your boards, turning every record into a potential processing center. While Basic Columns store your fundamental data and Interactive Columns enable user engagement, App Columns execute sophisticated business processes. They're the difference between a database that holds information and a platform that runs your business.
What makes App Columns revolutionary isn't just their functionality, but their contextual intelligence. Each app operates within the full context of your data—an Approval column knows the requester's history and spending limits, a Payment column understands the customer's payment preferences and transaction history, a Cart column sees real-time inventory levels and pricing rules. This deep integration eliminates the disconnection between business processes and business data that fragments traditional systems.
App Columns also excel at reducing operational complexity. Instead of training staff on multiple systems, managing numerous integrations, or maintaining separate databases, everything happens within your familiar board interface. This consolidation dramatically reduces training time, eliminates data synchronization issues, and provides a single source of truth for all business operations.
App Column Types
Approval Column
The Approval Column transforms your datasets into streamlined approval management systems where authorization workflows execute with one-click simplicity while maintaining complete visibility and control. Unlike traditional approval systems that scatter across email chains or require separate workflow tools, Approval Columns embed the entire approval process directly into your data, providing clear status visibility and action buttons exactly where decisions need to be made.
Essential Configuration
Approval configuration starts with defining who can approve records in your workflow. The system provides flexible approver assignment through multiple mechanisms. Choose organization-wide approvers for company-level decisions, workspace members for department-specific approvals, or worksheet members for project-based authorization. For dynamic approval routing, link to team member columns—Assignee or Teams fields—ensuring the right people have approval authority based on record ownership or team assignment.
The column visibility settings determine what information displays in your board view. Select which approval attributes to show—Status for current state, Approved At for timestamp tracking. These visible columns provide at-a-glance approval state without opening records.
Configure conditional button states to control when approval actions become available. Enable this feature to show Approve and Reject buttons only when specific conditions are met—ensuring approvals follow business rules. Set approval conditions based on field values, completion of prerequisites, or other business logic. This prevents premature approvals and enforces proper workflow sequence.
Enable Column Value Tracking to maintain a complete audit trail of all approval actions. This feature logs every status change with timestamps and user information, creating an immutable record for compliance and review. The tracking system captures not just the final decision but the entire approval journey—who requested, who approved, when actions occurred, and any state transitions.
How It Works
The approval interface presents itself as an elegant status indicator with contextual action buttons. When a record awaits approval, authorized users see clearly labeled buttons—a green "Approve" button and a red "Reject" button—positioned for quick action. The current status displays prominently with color-coded indicators that communicate state instantly: green for approved, yellow for pending, red for rejected.
When an approver clicks either action button, the column immediately updates the record status and logs the action with a timestamp in the Approved At field. The status change triggers any connected automations—notifications to requesters, updates to related records, or progression to next workflow stages. The entire action completes in a single click, eliminating the friction of traditional approval processes.
The system maintains complete context throughout the approval process. Every approval action happens within the full record context—approvers see all relevant data, related information, and history without leaving the board. This contextual awareness eliminates the back-and-forth typically required in approval processes, enabling informed decisions with confidence.
Payment Column
Payment Column
The Payment Column integrates payment processing capabilities directly into your workflows, transforming any record into a transaction point that can both receive money from customers and send money to vendors. Instead of managing payments through separate portals or manual processes, the Payment Column handles transactions seamlessly within your data context, supporting both incoming revenue and outgoing payments.
Essential Configuration
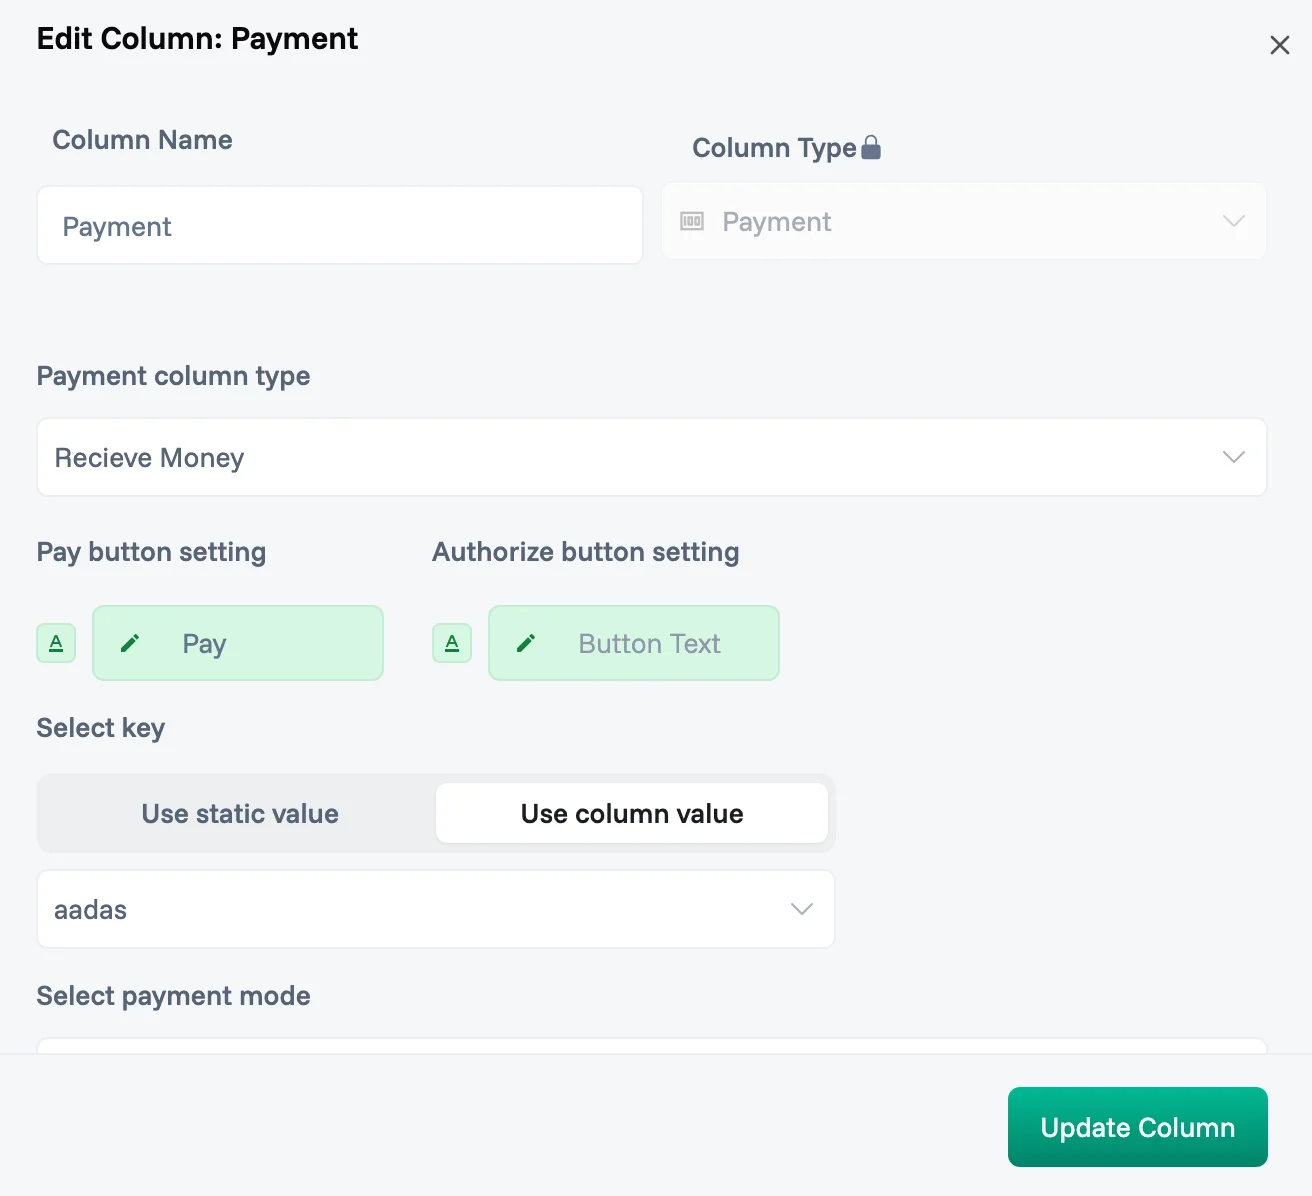
Payment configuration begins with selecting the payment direction—Receive Money for customer collections or Send Money for vendor payments. This fundamental choice determines how the column behaves and what options become available. The bidirectional capability means a single board can handle both accounts receivable and accounts payable, streamlining financial operations.
The payment connection requires selecting or configuring a client key that links to your payment provider credentials. Choose between static values for consistent payment routing or column values for dynamic key selection based on record data. This flexibility enables scenarios like multi-currency operations where different keys handle different currencies, or marketplace models where payments route to different merchant accounts. The key management system integrates with secure credential storage, ensuring sensitive payment information remains protected.
Configure the payment mode to control transaction processing behavior. Select from three button types that determine user options: Pay Only for immediate payment processing, Authorize Only for payment holds without capture, or Both to give users the choice at transaction time. This configuration adapts to different business models—immediate payment for products, authorization for services, or flexible options for varied transaction types.
Payment amount configuration offers powerful flexibility through the static/column value toggle. Use static values for fixed-price items or subscription fees. Reference column values to pull amounts from calculated fields, enabling dynamic pricing based on quantity, discounts, or custom formulas. This dual approach accommodates both simple fixed transactions and complex calculated amounts.
Currency settings establish the monetary framework for transactions. Select the payment currency that matches your business operations, with support for multiple international currencies. Choose the appropriate currency format for your region—ensuring amounts display correctly for your users. The system handles currency conversion and formatting automatically, presenting clean, localized payment interfaces.
How It Works
The Payment Column presents itself as an intelligent transaction interface that adapts to context. For Receive Money configurations, users see a payment button that initiates the collection process. Clicking triggers a secure payment flow—either embedded for seamless experience or hosted for maximum security. The interface pulls all transaction details from the record—amount, description, customer information—eliminating manual data entry.
For Send Money operations, the column facilitates outbound payments to vendors or partners. The interface validates payment details, confirms amounts, and processes transfers through configured payment rails. Whether paying invoices, distributing commissions, or handling refunds, the column manages the complete transaction lifecycle within your workflow.
The authorization flow provides sophisticated transaction control. When configured for authorization, the column captures payment details and validates funds without immediate transfer. This enables reservation systems, deposit handling, or delayed fulfillment scenarios. Authorized payments can be captured later through automation or manual action, providing flexibility in transaction timing.
Behind every transaction, the column maintains comprehensive tracking. Payment status updates in real-time—pending, processing, completed, or failed. Transaction IDs link to provider records for reconciliation. Error messages provide clear guidance for failed payments. The column becomes a complete payment history, eliminating the need for separate transaction logs.
The Edit Automation option enables sophisticated payment workflows. Trigger notifications on successful payments. Update inventory on completed transactions. Generate invoices automatically. Create follow-up tasks for failed payments. The automation integration transforms simple payment processing into complete business workflows.
Conditional Button State adds intelligent control to payment availability. Configure when payment buttons appear based on record status, field values, or user permissions. Ensure payments only process when orders are ready, contracts are signed, or approvals are complete. This conditional logic prevents premature transactions while streamlining the payment process when conditions are met.
Cart Column
The Cart Column creates sophisticated item selection and order management interfaces directly within your records, enabling complex multi-item transactions by connecting to any dataset in your workspace. Whether building internal requisitions, customer orders, or resource allocations, the Cart Column transforms a simple field into a complete item selection system that handles products, quantities, variants, and pricing calculations seamlessly.
Essential Configuration
Cart configuration begins with selecting the source dataset that contains your selectable items. This dataset connection is the foundation—it could be your product catalog, service list, inventory database, or any structured collection of items. The Cart Column dynamically pulls from this dataset, ensuring selections always reflect current availability, pricing, and options. The breadcrumb navigation shows the complete path to your selected dataset, maintaining clarity in complex workspace structures.
Define the essential column mappings that give items their identity and value. The Name Column determines what users see when browsing items—product names, service titles, or resource descriptions. The Price Column connects to your pricing data, enabling automatic calculations as users build their carts. The Quantity Column links to availability information, supporting inventory management and stock control. The Image Column adds visual context, helping users identify items quickly. The URL Column can link to detailed product pages or external resources. The Description Column provides additional context without cluttering the selection interface.
Configure variants to handle product variations elegantly. Add variant dimensions like size, color, material, or any attribute that differentiates your items. Each variant can map to specific columns in your dataset, creating a flexible system that adapts to your product complexity. The variant interface allows multiple dimensions—a shirt might have size and color variants, while a service might have duration and level options. This multi-dimensional variant system eliminates the need for separate SKUs for every combination.
Set up dimensions for advanced data aggregation and analysis. Dimensions enable grouping and summarizing cart data across different attributes. Configure aggregation methods—sum, average, count—to derive insights from cart contents. This feature transforms the Cart Column from a simple selector into an analytical tool that can calculate total values, average prices, or item counts by category, supporting complex pricing models and reporting requirements.
How It Works
The cart interface presents items from your connected dataset in an intuitive selection experience. Users browse or search available items with real-time filtering by category, price, availability, or any mapped attribute. Each item displays with its configured information—name, price, image, description—creating a rich selection interface. The search understands partial matches, handles variations, and suggests alternatives when exact matches aren't found.
Item selection flows naturally through the interface. Click to add items to the cart with default quantities. Adjust quantities with increment/decrement controls or direct entry. Select variants from dropdown menus that dynamically update based on availability. Remove items with single clicks. The cart updates in real-time—totals recalculate, stock levels adjust, variant options refresh. Users see exactly what they're selecting and its impact on their order.
Inventory control features maintain data integrity across your system. Limit Total Quantity prevents over-ordering by enforcing maximum quantities per cart or per item. Allow Restocking enables items to return to available inventory when removed from carts. Allow Back Orders lets users select out-of-stock items for future fulfillment. These controls ensure your Cart Column respects business rules while providing flexibility where appropriate.
The display options control what information appears in the cart interface. Display Price Column shows item prices and running totals directly in the selection interface. Display Total Quantity Column reveals the cumulative quantity of all items selected. These visibility controls let you optimize the interface for different use cases—show prices for customer orders, hide them for internal requisitions, display quantities for inventory management.
Conditional logic through Set Validity Condition enables sophisticated business rules. Configure when items can be added to carts based on user permissions, date ranges, minimum quantities, or any condition in your data. This ensures carts follow business logic—preventing orders outside business hours, enforcing minimum order values, or restricting certain items to specific user groups.
The Calculate Value option determines when and how the cart performs calculations. Set to "Never" for simple item lists without computation. Choose "On Click" or other options to set the logic using logic builder option. This flexibility balances performance with functionality, ensuring smooth operation regardless of cart complexity or dataset size.
Task List Column
The Task List Column embeds lightweight task management capabilities within individual records, transforming static data rows into dynamic work centers where teams create and track related tasks without switching to separate project management tools. The column provides a clean, focused interface for managing record-specific tasks with drag-and-drop simplicity and intelligent validation controls.
Essential Configuration
Task List configuration starts with validation logic that governs how tasks behave within your workflow. Set Ongoing Validation Logic to control task modifications after creation—enable to enforce business rules continuously, disable for flexible task management. This ensures tasks maintain required properties throughout their lifecycle, preventing unauthorized changes or maintaining data consistency.
Configure Insert Validation Logic to establish rules for new task creation. When enabled, this validates each new task against your defined criteria—checking for required fields, verifying permissions, or ensuring compliance with naming conventions. Disabled validation allows free-form task entry, perfect for brainstorming sessions or informal task tracking. The validation system balances structure with flexibility based on your workflow needs.
The Calculate Value setting provides advanced configuration for complex task workflows using logic builder. Define rules for task progression, automatic task generation, or conditional task visibility. Create dependencies between tasks, establish completion criteria, or integrate with other columns. This logic layer transforms simple task lists into intelligent workflow engines that adapt to your business processes.
How It Works
The Task List interface presents a clean, minimalist design that focuses on task content without unnecessary complexity. Tasks appear as simple text items with a distinctive drag handle (⋮⋮) that immediately signals their reorder-able nature. This visual cue invites interaction while maintaining a professional, uncluttered appearance that integrates seamlessly with your data.
Task creation happens inline with zero friction. Click the "Add Task" button to instantly create a new task entry. Type your task description directly in the field—no popups, no forms, just immediate task capture. Press Enter to save and create another, or click away to finish. The interface responds instantly, encouraging rapid task entry during meetings, calls, or brainstorming sessions.
Checklist Column
The Checklist Column provides structured progress tracking through checkable items, transforming complex processes into clear, manageable steps. Unlike simple to-do lists, Checklist Columns enforce completion requirements, maintain compliance records, and guide users through standardized procedures while adapting to specific contexts.
Essential Configuration
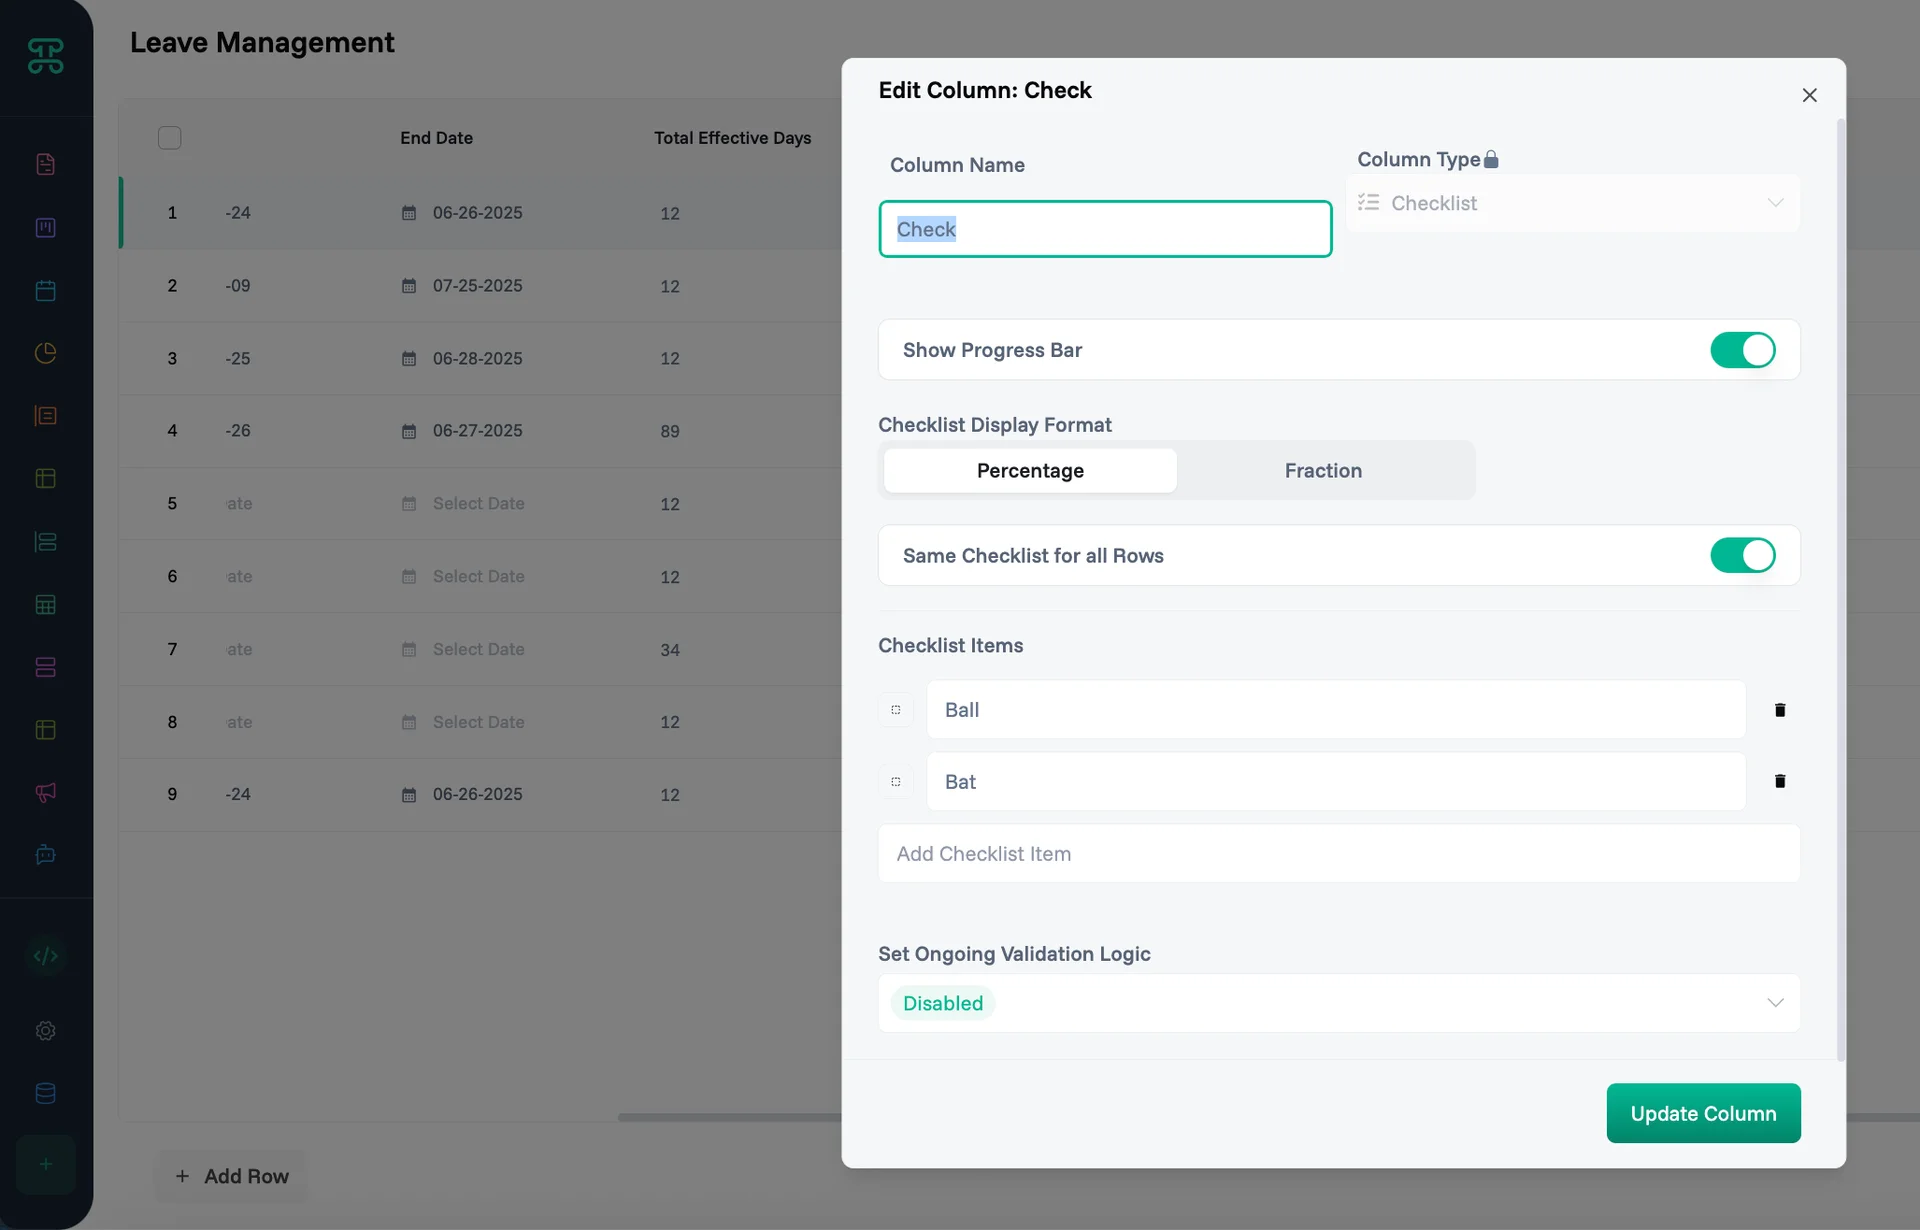
Toggle "Show Progress Bar" to enable visual completion tracking. When activated, users see a progress indicator that updates automatically as items are checked. Choose between "Percentage" format (showing "75%") or "Fraction" format (showing "3/4") based on what's most meaningful for your workflow. The progress bar provides instant visual feedback on task completion status.
The "Same Checklist for all Rows" toggle determines whether every record shares identical checklist items or can have unique lists. Enable this for standardized processes where everyone follows the same steps—quality control checks, onboarding procedures, compliance reviews. Disable it when different records require different tasks—custom projects, variable workflows, or context-specific requirements.
Define your checklist items clearly and actionably. Add items using the "Add Checklist item" button, creating entries that users can definitively complete. Reorder items by dragging the handle icons (⋮⋮) to establish logical workflow sequence. Keep item names concise but descriptive—"Verify customer identity" rather than just "Customer check."
Configure "Set Ongoing Validation Logic" to control how checklist items behave after creation. When set to "Disabled," users have full flexibility to check items in any order. When enabled through the dropdown, you can enforce business rules that govern item checking—certain items might require specific user roles, prerequisite completions, or time-based conditions.
"Set Insert Validation Logic" establishes rules for checking items. Keep it "Disabled" for free-form checking where users can complete items in any sequence. Enable it to enforce prerequisites—ensuring "Testing" can't be checked before "Development" is complete, or requiring manager approval for certain critical items.
How It Works
The checklist interface presents items in a clean, scannable list with checkboxes for each item. When configured with "Show Progress Bar" enabled, a visual indicator displays completion percentage prominently, updating in real-time as items are checked.
Users interact with the checklist through simple clicks—checking boxes to mark items complete, with immediate visual feedback.
When "Same Checklist for all Rows" is enabled, every record displays identical items, ensuring consistent process completion across all entries. This standardization is perfect for compliance workflows, quality assurance processes, or any procedure requiring uniform completion steps.
The validation logic, when configured, adds intelligence to the checking process. Ongoing validation might prevent unchecking critical items once completed, maintaining audit integrity. Insert validation could enforce completion sequences, ensuring logical workflow progression. These validations operate invisibly to users, simply preventing invalid actions rather than showing complex rules.
For items like "Ball" and "Bat" in your example configuration, users would see clear checkboxes next to each item. With the progress bar enabled and set to percentage display, checking one item in a two-item list would show "50%" completion, while checking both would show "100%" with potential visual confirmation like a green complete indicator.
Time Tracker Column
The Time Tracker Column transforms time management from estimation to precision, embedding automatic time tracking directly into your records with simple start/stop controls and real-time duration display. Instead of remembering to log hours or reconstructing time spent, the Time Tracker Column captures exact duration with one-click simplicity while supporting simultaneous tracking across multiple records.
Essential Configuration
Time tracking configuration starts with the Allow Tracking Multiple Rows setting, a powerful feature that enables users to run timers on several records simultaneously. When enabled, users can start a timer on one task, switch to another record and start its timer too, with both running concurrently. This reflects real-world multitasking where professionals juggle multiple activities, phone calls overlap with documentation, or parallel work streams require accurate time allocation. The system maintains independent timers for each record, ensuring accurate capture of overlapping work.
Configure the Calculate Value trigger to determine when the Time Tracker Column initializes or updates its calculations. "On Row Creation" starts timing immediately when new records are created, perfect for tracking response times or capturing work that begins at record creation. "On Click" waits for user interaction before starting, giving conscious control over when tracking begins. "On Focus" triggers when users select the field, automating time capture without requiring clicks. "Always" keeps timers ready continuously, while "Never" provides manual-only control. Each option serves different workflow needs—automatic for seamless capture, manual for deliberate tracking.
The Update Logic function provides advanced configuration for complex time tracking scenarios. Define rules for automatic timer stops, pause conditions during non-working hours, or integration with other columns. This logic layer transforms simple time tracking into intelligent workflow automation that adapts to your business patterns.
How It Works
The time tracker interface presents as a clean, minimalist display showing elapsed time in a clear HH:MM:SS format. A simple pause button (||) provides one-click control to stop timing, with visual feedback confirming the action. An information icon (ⓘ) offers additional context about tracked time.
The Time Tracker Column integrates seamlessly with reporting and analytics. Each time entry saves with timestamps, durations, and user information. Aggregate tracked time by user, by project, by date range. Export time data for billing, payroll, or productivity analysis. The column doesn't just track time—it creates a comprehensive time database that answers questions about where effort goes, how long tasks really take, and where efficiency improvements are possible.
Mini Sheet Column
The Mini Sheet Column embeds full spreadsheet functionality within your records, enabling complex calculations, data analysis, and financial modeling without leaving your workflow. Unlike static fields that store single values, Mini Sheet Columns contain entire spreadsheets with formulas, formatting, and multi-dimensional data structures that update dynamically and integrate with surrounding data.
Essential Configuration
Mini Sheet configuration begins with basic field settings that control how the embedded spreadsheet behaves within your workflow. The Required toggle determines whether users must enter data in the mini sheet before saving the record. Enable this for critical data that needs tabular structure—like itemized quotes where line items are mandatory, or comparison matrices that must be complete. Leave it disabled for optional supplementary data that enhances but isn't essential to the record.
Configure the Calculate Value trigger to determine when the Mini Sheet Column initializes or processes its logic. This flexibility ensures the mini sheet appears exactly when users need it without impacting performance when they don't.
How It Works
The interface feels like Excel or Google Sheets but operates entirely within your record, maintaining context and integration.
Formula creation provides intelligent assistance. Start typing = to begin formulas. Auto-complete suggests functions. Syntax highlighting shows structure. Error checking validates logic. Formula builder helps complex calculations. The system guides users through formula creation while preventing common errors.
Calculation processing happens in real-time with dependency tracking. Change an input and all dependent cells update instantly. Circular references detect and warn. Calculation order optimizes for performance. Results push to other columns automatically. The Mini Sheet Column handles complex calculation chains efficiently while maintaining accuracy and performance.
Address Column
The Address Column manages location data with structured field management and flexible display options, providing standardized address storage without requiring complex mapping integrations. Instead of treating addresses as unstructured text, the Address Column breaks locations into component fields while offering multiple display formats, ensuring addresses are both human-readable and system-processable.
Essential Configuration
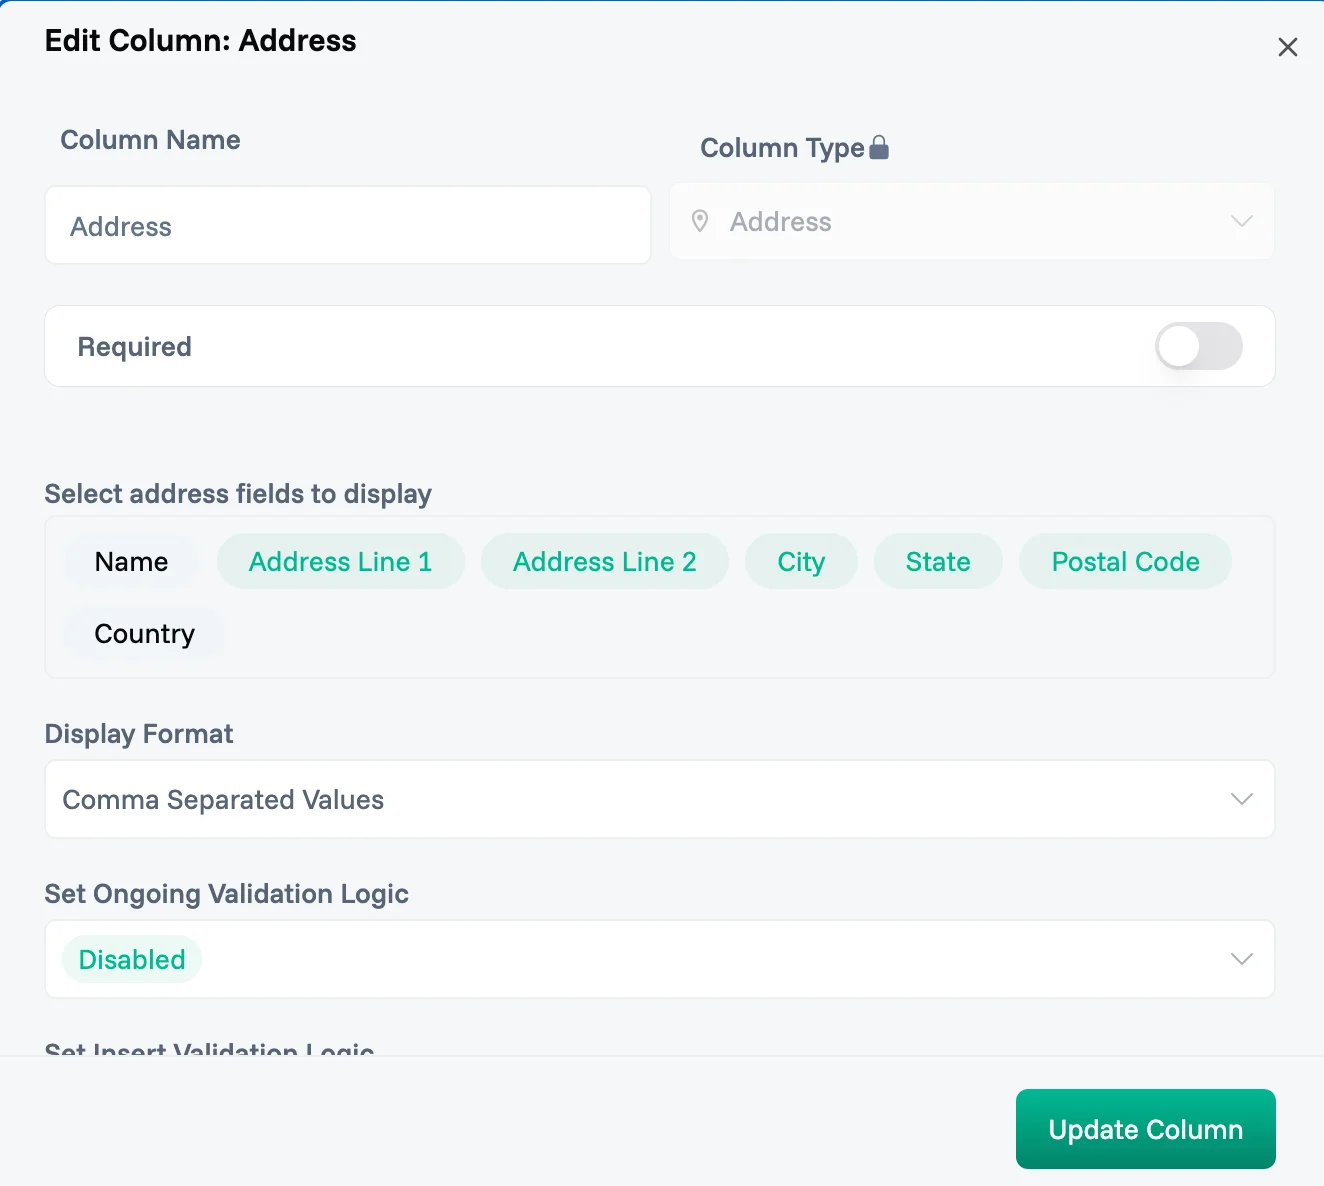
Address configuration begins with selecting which address fields to display in your interface. Choose from seven standard components: Name for location labels or recipient names, Address Line 1 for street addresses, Address Line 2 for additional details like apartment numbers, City for municipality, State for regional divisions, Postal Code for mail routing, and Country for international addresses. Select only the fields relevant to your use case—domestic shipping might skip Country, while contact records might omit Address Line 2. This selective display keeps interfaces clean while capturing necessary location data.
The Required toggle determines whether users must provide address information before saving records. Enable this for critical workflows where location data is essential—shipping addresses for orders, billing addresses for invoices, or service locations for field work. Leave it disabled when addresses are supplementary information that enhances but doesn't define the record. This flexibility accommodates both address-critical and address-optional workflows.
Configure the Display Format to control how addresses appear in your board views. "Comma Separated Values" presents the complete address as a single line with commas between components—perfect for compact views where space is limited. "Display values in different columns" breaks each address component into its own column, providing granular visibility and enabling sorting or filtering by specific address fields. This dual format approach balances readability with analytical capability.
Set the Calculate Value trigger to determine when address processing occurs. "Never" keeps the field static, accepting only manual entry. Other options could enable address validation on entry, geocoding on save, or format standardization on update. This trigger system ensures address processing happens at the right moment without impacting performance during routine data entry.
How It Works
The address entry interface adapts to your configured fields, presenting only the components you've selected. Each field appears with clear labels, guiding users through structured address entry. The interface might provide type-ahead suggestions for cities and states, postal code validation, or country selection dropdowns—features that improve accuracy while maintaining simplicity.
When displayed as comma-separated values, addresses render as clean, readable strings that fit naturally in table views. "123 Main St, Apt 4B, New York, NY, 10001, USA" reads naturally while maintaining structure. This format works perfectly in lists, reports, and exports where addresses need to be human-readable without taking excessive space.
The multi-column display format transforms address visualization for analytical workflows. Each component gets its own column—sort by city to group regional data, filter by postal code for delivery zones, or analyze by country for international distribution. This columnar view enables address-based analysis that would be impossible with unstructured text fields.
Address standardization happens transparently when configured. The column can format entries consistently—capitalizing properly, abbreviating states correctly, validating postal codes. This standardization ensures addresses work reliably with external systems like shipping APIs, mapping services, or mail merge operations, without requiring manual cleanup.
The Address Column maintains data integrity through structured storage. Even when displayed as comma-separated values, the underlying data remains properly separated by field. This structure enables reliable parsing, clean exports, and consistent formatting. Changes to display format don't affect the stored data—switch between comma-separated and columnar views without data loss or corruption.
Behind its simple interface, the Address Column provides the foundation for location-based features. While the basic configuration focuses on structured entry and display, the column can support advanced capabilities when needed—distance calculations, territory assignments, or mapping visualizations. This extensibility means starting simple doesn't limit future growth.
API Column
The API Column connects your data to external services through HTTP requests, pulling real-time information from any API directly into your records. Whether fetching customer data from a CRM, retrieving shipping status from carriers, or syncing with internal systems, the API Column maintains live connections that keep your data current without manual updates or complex integrations.
Essential Configuration
API configuration begins with defining the Fetch Button that triggers API calls. Customize the button text to clearly communicate its action—"Get Customer Data", "Check Status", or "Sync Info". This button appears in your column, giving users control over when API calls execute.
Select the HTTP Method that matches your API's requirements. Choose "Get" for retrieving data—the most common operation for reading information from external services. Select "Post" when sending data to create or update resources in the external system. The method determines how data flows between your board and the API, ensuring proper communication protocol.
Configure Authorization Type to secure your API connections. Select "None" for public APIs that don't require authentication. Choose "Bearer" for token-based authentication common in modern APIs—you'll provide a token that validates your access. Select "Basic Auth" for username/password authentication used by many enterprise systems. The authorization ensures only authorized requests reach the external service, maintaining security while enabling integration.
Set the Webhook URL to define your API endpoint. Enter the complete URL where your API lives, or dynamically reference a column value using the @ selector to pull URLs from your data. This flexibility enables scenarios where different records connect to different endpoints—each customer might have their own API URL, or different record types might call different services. The dynamic URL capability transforms the API Column from a single-endpoint connector to a flexible integration platorm that adapts to your data.
Build your request with Custom Headers that provide additional context to the API. Add headers for content type, API versions, or custom authentication tokens. Each header consists of a key-value pair—enter the header name and either a static value or reference a column value dynamically. Common headers include "Content-Type: application/json" or "API-Key: your-key-here". Headers fine-tune how the API interprets and responds to your requests.
Define Query Parameters to send data with your API requests. Add parameters as key-value pairs that append to your URL. Use static values for consistent parameters or reference column values to send record-specific data. For example, send a customer ID from your record to retrieve their specific information, or include date ranges for filtered results. Parameters make your API calls dynamic and contextual.
How It Works
The API interface provides a complete testing environment within your configuration. The Preview URL section shows exactly what URL will be called, including all parameters. Select a row to preview using the dropdown—this shows how the API call will work with real data from your records. Click "Test" to execute the API call immediately and see the actual response in the Preview Response area. This immediate feedback ensures your configuration works before deploying to users.
The Preview Response shows the raw API response during configuration, helping you understand the data structure. The Add Columns section lets you map API response fields to new columns in your board—extract customer names, order statuses, or any data from the response. Each mapped column automatically updates when the API is called, keeping your data synchronized.
Query parameters and headers can reference column values dynamically using the column selector (shown as "Type @ to select column value"). This creates powerful integrations where each record sends its own specific data to the API. A customer record sends its ID to retrieve orders, a product record sends its SKU for inventory checks, or a location record sends coordinates for weather data. This dynamic referencing eliminates manual parameter entry while ensuring accurate, record-specific API calls.
Keys Column
The Keys Column provides secure credential management for storing and managing API keys, tokens, and other sensitive credentials within your workflows. Instead of hardcoding credentials in multiple places or sharing them insecurely, the Keys Column creates a centralized, encrypted storage system that maintains security while enabling authorized access to external services.
Essential Configuration
Keys configuration begins with basic field settings that establish how credentials are managed in your workflow. The Required toggle determines whether users must provide credential information before saving records. Enable this for workflows that depend on external service connections—API integrations, payment processing, or third-party authentication. Leave it disabled when credentials are optional or will be added later in the workflow process.
Select a Provider from your configured credential stores to determine where and how keys are managed. The provider dropdown shows available credential management systems integrated with your workspace. Each provider may offer different security levels, access controls, and credential types. This provider selection ensures keys are stored in the appropriate vault with the right security measures for your use case.
The clean configuration interface keeps credential management simple and secure. Unlike complex key management systems that require extensive setup, the Keys Column provides just the essential controls needed to store and reference credentials safely. This simplicity reduces configuration errors that could compromise security while making credential management accessible to non-technical users.
How It Works
Adding new keys happens through a streamlined modal interface that captures just the essential information. Click to add a new key and the "Add New Key" dialog appears. Input the actual credential value in the secure password field—shown as dots to prevent shoulder surfing.
The Keys Column integrates seamlessly with other App Columns that require authentication. API Columns pull credentials for external service calls. Payment Columns use stored keys for transaction processing. Integration columns reference credentials for third-party connections. This integration happens securely—credentials pass encrypted between columns without exposure in the interface or data layer.
Security remains paramount throughout the credential lifecycle. Keys are encrypted at rest in the provider's storage. Transmission happens over secure channels only. Access logs track who uses credentials and when. Rotation reminders ensure credentials stay fresh. Revocation immediately disables access across all references. These security measures operate transparently, maintaining protection without impeding legitimate use.
The provider-based architecture enables flexible credential management strategies. Different providers can enforce different security policies—some might require multi-factor authentication for access, others might implement automatic rotation, and others might provide team-based access controls. This flexibility lets organizations choose the security model that matches their requirements while maintaining a simple user interface.
Common Use Cases
Purchase Order Management
Columns Setup: Cart (item selection), Approval (authorization workflow), Payment (vendor payment), Task List (fulfillment tracking)
Transform manual purchasing into an automated workflow. Requesters use Cart columns to select items with automatic budget checking. The Approval column routes based on amount and category—under $1,000 to managers, over $10,000 to finance. Approved orders trigger Payment columns for vendor processing. Task Lists track receipt and verification.
The result: purchase cycle time reduced by 70%, complete audit trail for compliance, no lost or duplicate orders, automatic three-way matching.
Customer Onboarding System
Columns Setup: Address (location verification), API (CRM sync), Checklist (onboarding steps), Task List (action items), Keys (credential storage)
Streamline customer onboarding with integrated verification and setup. Address columns validate and geocode customer locations. API columns check credit and sync with Salesforce. Checklists ensure all requirements are met. Task Lists assign setup activities to team members. Keys columns securely store customer API credentials.
The result: onboarding time reduced from days to hours, no steps missed or duplicated, automatic CRM synchronization, secure credential management.
Professional Services Billing
Columns Setup: Time Tracker (hour logging), Mini Sheet (rate calculations), Approval (timesheet approval), Payment (invoice collection)
Automate the entire billing cycle for professional services. Time Trackers capture billable hours with project and task categorization. Mini Sheets calculate bills with rates, taxes, and adjustments. Approval columns route timesheets for manager sign-off. Payment columns generate and send invoices with online payment options.
The result: billing accuracy improved by 95%, invoice generation time reduced by 80%, payment collection accelerated by 15 days, complete audit trail for disputes.
Field Service Management
Columns Setup: Address (service locations), Task List (work orders), Time Tracker (job duration), Checklist (quality control), Payment (customer collection)
Coordinate field service operations from dispatch to payment. Address columns map service locations and optimize routes. Task Lists detail work orders with parts and instructions. Time Trackers log actual service time. Checklists ensure quality standards. Payment columns process customer payments on-site.
The result: service efficiency increased by 40%, first-visit resolution up 25%, payment collection immediate, quality scores improved by 30%.
Inventory Requisition System
Columns Setup: Cart (item selection), API (inventory check), Approval (authorization), Task List (fulfillment)
Enable self-service inventory requests with automatic fulfillment. Cart columns let users select needed items with real-time availability. API columns verify stock levels from warehouse systems. Approval columns route based on cost centers and spending limits. Task Lists manage picking and delivery.
The result: requisition processing time cut by 60%, inventory accuracy maintained at 99%, automatic reorder triggering, complete usage analytics.
Common Mistakes to Avoid
1. Over-Engineering Workflows
Mistake: Creating unnecessarily complex App Column configurations
15-stage approval workflows for simple requests
Payment flows with dozen of conditional paths
Cart configurations with hundreds of rarely-used options
Solution: Start simple and add complexity only when needed. Begin with basic two-stage approvals. Implement straightforward payment flows. Configure essential cart features first. Monitor usage to identify where additional complexity adds value versus confusion.
2. Ignoring API Limits
Mistake: Configuring API columns without considering rate limits
Calling APIs on every record view
No caching of stable data
Parallel calls exceeding quotas
Solution: Implement intelligent caching strategies. Update API data on schedules appropriate to change frequency. Batch API calls when possible. Monitor usage against limits. Configure fallback behavior for rate limit errors.
3. Weak Security Configuration
Mistake: Inadequate security for sensitive App Columns
Storing credentials in plain text
Overly broad approval permissions
No audit logging for payments
Solution: Always encrypt sensitive data in Keys columns. Follow principle of least privilege for permissions. Enable comprehensive audit logging. Implement approval requirements for critical operations. Regular security reviews of all App Column configurations.
4. Poor Error Handling
Mistake: Not planning for App Column failures
No fallback for payment provider outages
Approval workflows that deadlock
API columns that show cryptic errors
Solution: Configure multiple payment providers for redundancy. Design approval workflows with escalation paths. Provide clear error messages with actionable next steps. Implement retry logic for transient failures. Monitor error patterns to identify systematic issues.
5. Insufficient Training
Mistake: Deploying App Columns without user preparation
Complex Cart interfaces without documentation
Approval workflows without clear criteria
Time tracking without guidelines
Solution: Create user guides for each App Column. Provide templates and examples. Run training sessions for complex workflows. Start with pilot groups before full deployment. Gather feedback and iterate on configuration.
6. Neglecting Performance Impact
Mistake: Adding App Columns without considering system load
Multiple API columns updating simultaneously
Complex Mini Sheet calculations on every view
Uncached Address geocoding requests
Solution: Monitor system performance as you add App Columns. Implement caching for expensive operations. Use asynchronous processing for heavy computations. Batch updates when possible. Regular performance testing with realistic data volumes.
Next Steps
Combine App Columns with other Proma features:
@Standard Columns - Foundation data types that App Columns enhance with specialized functionality
@Interactive Columns - User engagement tools that trigger App Column workflows
@Automation Engine - Orchestrate complex processes across multiple App Columns
Have questions? Our team is ready to help at support@proma.ai